

A Misunderstood Friend in the Garden and Kitchen
BY PETER TODARO | PHOTOS BY TAYLOR VAN KOOTEN

AT THE END OF EVERY GROWING SEASON, I schlep bags upon bags of sunchokes, also known as Jerusalem artichokes, from my community garden plot back to my house. To my wife’s chagrin, they fill the fruit and vegetable drawers of our fridge, while I try desperately to give them away to friends, neighbors, and the good people of the Buy Nothing Easton Facebook group.
The conversations with these would-be sunchoke recipients are always the same. I’m met with “oh, no, what would I do with them?” or “I don’t like artichokes,” or “why does that look like ginger?”
My favorite, however, comes from those who have a bit of knowledge: “Don’t those make you pass gas?”
Most often, sadly, the hundred-odd pounds of sunchokes sit in my fridge through the winter months, while I feverishly pickle, ferment, fry, bake, and make soup out of as many of them as I can. Many are planted again as soon as the soil can be worked in the spring, quite literally sowing the seeds for this process to occur again next year.
You may ask, “Why do this to yourself? Why grow inordinate amounts of a weird tuber that no one wants?” Well, dear reader, it’s because I’m a sunchoke evangelist and I’d like to try to convince you to become one, too . . . and to please take some of these things off my hands.
I’m a sunchoke evangelist and I’d like to try to convince you to become one, too . . . and to please take some of these things off my hands.
INTRODUCING THE SUNCHOKE
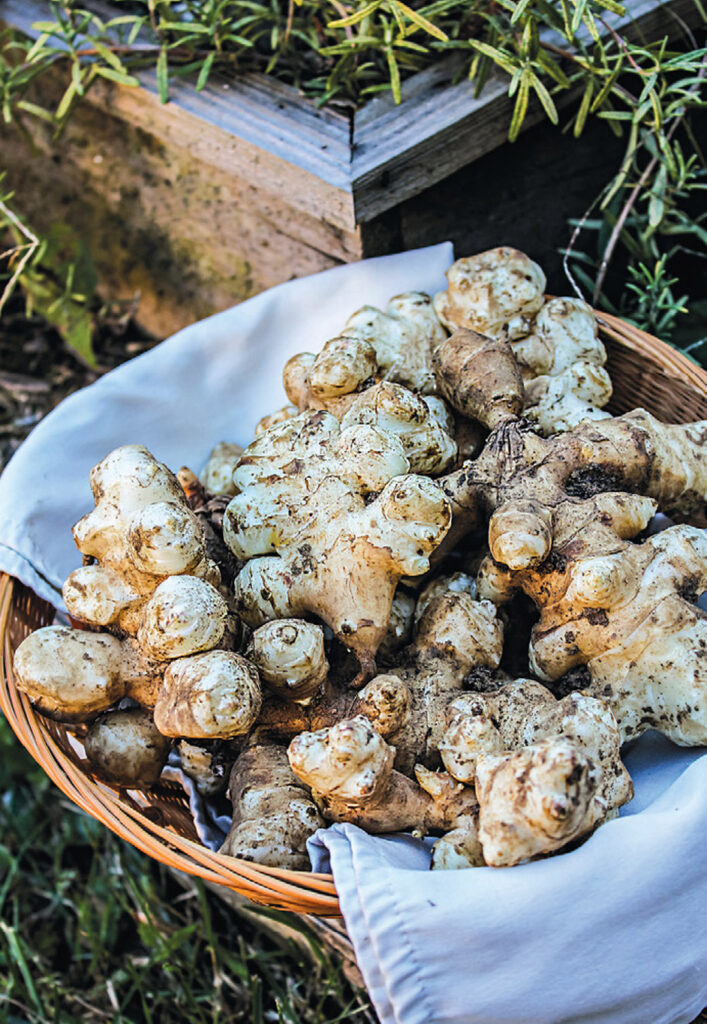
The sunchoke, Helianthus tuberosus, is a perennial member of the sunflower family that produces tall stems adorned with yellow flowers and edible tubers below ground. Also commonly (and confusingly) known as Jerusalem artichokes, sunchokes are native to North America and have nothing to do with the city of Jerusalem, nor do they taste or resemble anything like an artichoke. Instead, the knobby tubers of these towering plants, which can grow to eight to nine feet tall, taste a bit like a nutty potato.
Rather than being starchy, sunchoke tubers contain a great deal of inulin, a prebiotic which, after consumed, is metabolized by bacteria in our guts, instead of being conventionally digested. The body’s inability to fully digest inulin is the cause of sunchokes’ unfortunate—and, I would argue, overblown—reputation as the cause of post-dinner wind-breaking. But more on that later.
UNDERSTANDING THE PLANT AND HOW TO GROW IT
My sunchoke-growing journey began when I purchased a pound of sunchokes at a big-box grocery store for around $5. These had been intended to be used as food, not seed, and had been shipped from who-knows-where, likely grown conventionally and coated with a wax to keep them from getting soft. But it didn’t matter that these tubers were less-than-ideal planting candidates. The defining characteristic of the sunchoke is fecundity. It will, I am convinced, outlive us all. After planting, my pound soon exploded into more sunchokes than I could eat in a winter.
What’s the most impressive about sunchokes is their ability to thrive in less-than-ideal conditions. They don’t need compost applications, fancy foliar sprays, or even high-quality soil. In fact, a permaculture writer in Vermont famously grows them in fill next to his driveway to show their resilience. This hardiness makes sunchokes incredibly easy to grow. In the absence of pests or serious disease, sunchokes are a friend to the novice gardener. Simply mulching with straw or wood chips early in the season is enough to add a foot or two to their height and significantly increase yields. (I pass this on as both a tip and a warning, depending on your perspective.)
As the plants grow taller and reach maturity near the end of summer, the sunchokes’ flowers bloom, attracting honey bees and native pollinators alike. The tubers mature, too, with each plant producing between five to 10 pounds by harvest time.
HOW TO DEAL WITH SUNCHOKES
After harvest, it’s important to keep the chokes cool and moist. But first, let’s get real: When you pull them out of the ground, you’ll notice they’re absolutely filthy, dirt caked into tons of nooks and crannies. You can either soak them and wash them (multiple times), or store them dirty from harvest in the fridge. Either before or after you’ve washed them off (please invest in a veggie brush if you don’t have one already), transfer them to a large zip-top bag. They can keep in the fridge for many months, as long as they’re kept slightly moist in their bags.
While I often plant saved tubers in the spring, doing so is not necessary. It’s inevitable that you will miss some sunchokes while digging for them and even the smallest nubs will become fully fledged plants during the next growing season. For this reason, sunchokes can be difficult to eradicate, so it’s best to plant them in a space you’re happy to dedicate to them for the long term. The easiest way to remove them (not that you would want to!) is to conduct a thorough harvest in the fall, then dig up any new plants you see in the spring, before covering the location with cardboard or a silage tarp.
Regardless of whether you plan to grow sunchokes on your own, or simply purchase them from a store or farmers market, it’s important to recognize all of the boxes sunchokes check. A native, pollinator-friendly plant that comes back every year without fail? Produces huge yields of a delicious staple crop? And one that can be stored all winter? Check, check, check!
SUNCHOKES IN THE KITCHEN
When it comes to dispelling sunchokes’ slanderous and unfortunate nickname of “fartichokes,” knowledge and preparation in the kitchen is critical. As we have discussed, the gassy culprit that partially makes up sunchokes—inulin—can cause flatulence due to how it is digested by the body. But you can manipulate the inulin levels. There are three ways: convert the inulin into sugar through exposure to cold; break it down through long, slow cooking; or feed it to lactobacillus bacteria through the pickling and fermenting process.
Sunchokes’ inulin begins to convert into fructose the moment they’re exposed to cold temperatures, so you can wait to harvest them until well after the first frost to minimize the impact on your digestion. As long as the soil can still be worked, the longer you wait, the more sugar and less inulin the sunchokes will have.
When it comes to breaking down inulin by cooking, baking the sunchokes (as in Chef Jon McCain’s sunchoke gratin recipe) is second only to sunchoke soup, which is my go-to. Pan-fry or roast the sunchokes until tender, then slowly sauté with a healthy portion of garlic, onions, thyme, mushrooms, and butter before adding milk or a plant-based alternative, immersion blending the concoction and simmering slowly for as long as you want. The result is a delightful umami-flavored sunchoke bisque that won’t result in any errant toots. (Try adding a Yukon Gold potato to your sheet pan during roasting for an extra-creamy soup).
Finally, fermenting sunchokes is as easy as adding them to your favorite kraut-chi recipe. Get creative by adding raw thinly sliced sunchokes to your ferment, like you would with root vegetables and cabbage.
It’s only by working intentionally with the plant and recognizing the steps that need to be taken to break down inulin prior to eating that we can change sunchokes’ reputation. With education and culinary creativity, I’m confident that we can increase the cultivation and consumption of this wonderful plant.

Sunchoke Gratin
Ingredients
- 1 pound sunchokes, washed thoroughly
For the topping
- 2 tablespoons unsalted butter
- 1½ cups panko breadcrumbs
- 2 tablespoons freshly grated Parmesan
- ¼ cup chopped fresh parsley
For the Mornay
- ¼ cup plus 2 tablespoons unsalted butter
- 1 small shallot minced
- 3 cloves garlic minced
- 2 teaspoons kosher salt (plus more as needed)
- ½ teaspoon white pepper (or black)
- 2 cups whole milk
- ¼ teaspoon ground nutmeg
- 1 tablespoon Dijon mustard
- 2–3 sprigs fresh thyme
- ¼ cup all-purpose flour
- 4 ounces grated Gruyère
- 4 ounces grated Gouda
Instructions
- Once you’ve washed and cleaned the sunchokes, slice them thinly with a chef’s knife, mandoline, or the slicer attachment in a food processor—wafer thin (1 to 2 mm). Bring a pot of salted water to boil and blanch (cook them for 1 to 2 minutes) until tender. Transfer them to a cold-water bath with ice to shock them—this stops the cooking process. You can do this up to 2 days ahead of time and keep them in the fridge if you like, covered. Otherwise, pat them dry to remove excess water and transfer to a large bowl.Melt 2 tablespoons butter in a medium skillet over medium heat. Add the breadcrumbs, stirring to evenly coat them in butter. Remove from the heat when toasty, after about 5minutes. Add in the Parmesan and parsley and transfer to a bowl. Set aside.Preheat oven to375 F. Grease a 2-quart gratin baking dish (or 2 smaller ones) with 1tablespoon butter.Heat another 2tablespoons butter in a medium saucepan over medium heat. When it foams, add the shallot and cook until translucent, stirring, about 3–5 minutes. Add the garlic, and stir and cook until it becomes aromatic, being careful not to burn(1–2 minutes).Add the salt, pepper, milk, nutmeg, and Dijon mustard; whisk to combine. Add the thyme sprigs, bring to a simmer, and then turn off heat and let it steep, covered, for a half hour to an hour (or longer). Strain the milk through a fine-mesh sieve into a glass measuring cup. Discard solids.Melt the remaining¼ cup butter in the same medium saucepan and add the flour, whisking together to form a roux. Cook for a minute or 2. Add the infused milk and whisk at a low simmer until it thickens. Add the cheese, stir until it’s melted, and remove from the heat.Add enough of the Mornay to cover the sunchokes and stir together to coat completely and evenly. Layer the baking dish (or dishes) with the chokes, smoothing them down as you go. Sprinkle the top with breadcrumbs and bake for30 to 40 minutes, uncovered, until the cheese is bubbly and the top is golden brown.
